m (Reverted edits by 98.212.83.88 (talk | block) to last version by Surriela) |
No edit summary |
||
| Line 100: | Line 100: | ||
|{{npc|Collector Memekin}}||{{item|Shulack Sailor's Pauldrons}}<br/>{{item|Shulack Sailor's Boots}} |
|{{npc|Collector Memekin}}||{{item|Shulack Sailor's Pauldrons}}<br/>{{item|Shulack Sailor's Boots}} |
||
|- |
|- |
||
| − | |{{npc|Golden Eye Mantutu}}||{{item|Shulack Sailor's Leggings}}<br/>{{item|Shulack Sailor's Breeches}}<br/>{{item|Shulack Sailor's Chausses}}<br/>{{item|Shulack Sailor's Greaves}}<br/>{{item|Shulack Pirate's Gloves}}<br/>{{item|Shulack Pirate's Vambrace}}<br/>{{item|Shulack Pirate's Handguards}}<br/>{{item|Shulack Pirate's Gauntlets}}<br/>{{item|Steel Beard Pirate's Shoes}}<br/>{{item|Steel Beard Pirate's Boots}}<br/>{{item|Steel Beard Pirate's Brogans}}<br/>{{item|Steel Beard Pirate's Sabatons}}<br/>{{item|Steel Beard Pirate's Leggings}}<br/>{{item|Steel Beard Pirate's Breeches}}<br/>{{item|Steel Beard Pirate's Chausses}}<br/>{{item|Steel Beard Pirate's Greaves}} |
+ | |{{npc|Golden Eye Mantutu}}||{{item|Shulack Sailor's Leggings}}<br/>{{item|Shulack Sailor's Breeches}}<br/>{{item|Shulack Sailor's Chausses}}<br/>{{item|Shulack Sailor's Greaves}}<br/>{{item|Shulack Pirate's Gloves}}<br/>{{item|Shulack Pirate's Vambrace}}<br/>{{item|Shulack Pirate's Handguards}}<br/>{{item|Shulack Pirate's Gauntlets}}<br/>{{item|Steel Beard Pirate's Shoes}}<br/>{{item|Steel Beard Pirate's Boots}}<br/>{{item|Steel Beard Pirate's Brogans}}<br/>{{item|Steel Beard Pirate's Sabatons}}<br/>{{item|Steel Beard Pirate's Leggings}}<br/>{{item|Steel Beard Pirate's Breeches}}<br/>{{item|Steel Beard Pirate's Chausses}}<br/>{{item|Steel Beard Pirate's Greaves}}<br/>{{item|Mantutu's Fabled Shoe Box}} |
|} |
|} |
||
| − | (Add name of gold shoe box) |
||
{{Steel Rake Cabin nav}} |
{{Steel Rake Cabin nav}} |
||
Revision as of 21:56, 24 September 2013
Steel Rake Cabin is a solo instance for Level 40+. This is the mid level of the three level Steel Rake ship. The entrance is in either Pandaemonium's Airship Dock, or Sanctum's Outer Dock. Cooldown is four hours for re-entry.
Accessing the Instance
In order to access the Steel Rake instances, players must complete quests.
- Asmodians - Complete
 <The Shugo from Pandaemonium> [41] and then follow up quest
  <A Suspicious Call> [41]. Then speak to <Sarurinrinerk> to enter the instance.
 - Elyos - Complete
 <Suspicious Shugo> [41] and then follow up quest <The Price of Goodwill> [41]. Then talk to <Amirinrinerk> to enter the instance.
Walkthrough
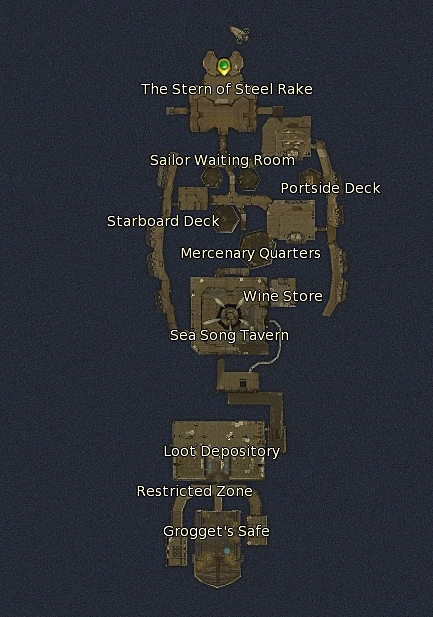
This solo instance is a good way to gain XP and gear. Although there are some double pulls and a few triple pulls, overall the instance is very manageable. The first area is the stern, which has a few patrols, but is very easy to negotiate and quite straightforward. Head straight ahead, and go through the doorway into the Sailor Waiting Room.
<Sweeper Nunukin> can be in one of the two small rooms off the main corridor. The sleeping mobs are passive, and will not aggro unless hit by an AoE. He is fast, so be prepared. Kill Sweeper Nunukin to receive the <Sailor Waiting Room Key>, which is needed to proceed to the next area. Go up the stairs, open the door with the key and onto the next area.
The first room on the right of the Port Side Deck is the Navigation Resource Room, which has the quest objects - the Steel Rake Logbook and the Strongbox. Continue down the deck to the Sailor Quarters.
Killing <Kedomke the Drinker> will give the key to the Mercenary Quarters. The Sailors Quarters has one avoidable three pull, although two of the three are low HP <Kobold Workers>. The rest of the mobs are easy kills.
Inside the Mercenary Quarters, <Firelord Kadomch> can drop Shulack armor pieces. This room has a few double pulls, one at the door, which can create a bit of a challenge as they are mage class. Inside, it is fairly straightforward to clear to the boss, and the sleeping mobs remain asleep (unless you aggro them). Continue along to the Starboard Deck, again easy kills, and finally to the Sea Song Tavern.
The Tavern's main attraction is <Madame Bovariki> who can spawn either behind the bar to the left or in the middle of the far side straight ahead. She uses fear, so it advisable to clear all non-sleeping mobs before attempting to pull her. The many other mobs in the Tavern provide quest drops, and very good XP, so it is a good idea to clear anyway. Madame always drops the <Loot Depository Key> and may also drop the key to the second floor - the <Tavern Key 2nd Floor>.
The Loot Depository leads down several ramps with fairly easy kills. Tamer Anikiki waits at the door to the room with Key Boxes. A timer starts and counts down the time until all the key boxes disappear. There are up to four each time which can be found in several possible locations. Again, there are quest mobs here, so after the timer expires, continue to clear required mobs. Head towards the far wall, where the stairs are to the upper level. Clear until entering the Restricted Zone.
There are two Key bosses in the Restricted Zone, and both will drop the key to Grogget's Safe, so it is not necessary to kill both although they do drop Shulack armor. Get a key, and kill the Petrahulk to get into the Safe.
The last area is Grogget's Safe, and dominated by <Golden Eye Mantutu> a huge monkey who is not very happy. Tamer Anikiki seems to be holding him captive. The key to successfully killing him is to be sure to use the Water Supply Device to dispel the Thirst buff or the Feed Supply Device to dispel the Hunger buff. Kill Mantutu, and Tamer Anikiki. Use the Hidden Escape Exit to exit the instance.
Quests
- Asmodian
| Name | Location | Start NPC |
|---|---|---|
| Airship Dock, Pandaemonium | <Payrinrinerk> | |
| Airship Dock, Pandaemonium | <Moorinerk> | |
| Airship Dock, Pandaemonium | <Teirunerk> | |
| Airship Dock, Pandaemonium | <Habirunerk> | |
| Apellbine Tavern, Pandaemonium | <Jeckrow> | |
| Apellbine Tavern, Pandaemonium | <Jeckrow> | |
| Black Cloud Island, Reshanta | <Jielinlinerk> | |
| Grogget's Safe, Steel Rake Cabin | Old Book |
- Elyos
| Name | Region | Start NPC |
|---|---|---|
| Dionysia Tavern, Sanctum | <Ludina> | |
| Outer Dock, Sanctum | <Peperinrinerk> | |
| Outer Dock, Sanctum | <Koruchinerk> | |
| Outer Dock, Sanctum | <Peperinrinerk> | |
| Dionysia Tavern, Sanctum | <Mikurunrunerk> | |
| Outer Dock, Sanctum | <Peperinrinerk> | |
| Dionysia Tavern, Sanctum | <Mikarinerk> | |
| Grogget's Safe, Steel Rake Cabin | Old Book |
Steel Rake Cabin Areas
- Grogget's Safe
- Loot Depository
- Mercenary Quarters
- Navigation Resource Room
- Port Side Deck
- Restricted Zone
- Sailor Quarters
- Sailor Waiting Room
- Sea Song Tavern
- Starboard Deck
- The Stern of the Steel Rake
- Wine Store
Unique Drops
| |||||