No edit summary Tag: Visual edit |
No edit summary Tag: Visual edit |
||
| (5 intermediate revisions by the same user not shown) | |||
| Line 1: | Line 1: | ||
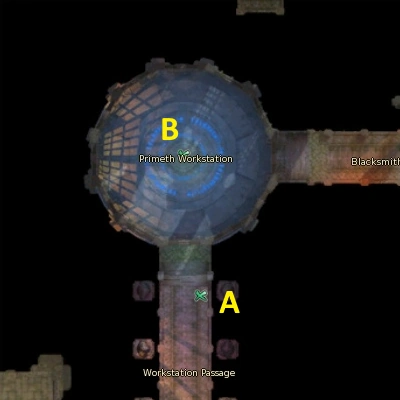
[[File:PF - Map.png|thumb|300x300px|Primeth's Forge map]] |
[[File:PF - Map.png|thumb|300x300px|Primeth's Forge map]] |
||
| − | '''Primeth's Forge''' (PF), also called Prometun's Workshop, is a 6-player group instance for players of level '''80''' and above. Introduced in 6.0, it is accessible from ''Endorim Temple'', central area of [[Lakrum]]. This gigantic facility was built by Lakrum's [[Jotun]] to forge their weapons, but was seized by the [[Ereshkigal Army|Frigida Legion]] upon Ereshkigal's occupation. |
+ | '''Primeth's Forge''' (PF), also called Prometun's Workshop, is a 6-player group instance for players of level '''80''' and above. Introduced in 6.0, it is accessible from ''Endorim Temple'', central area of [[Lakrum]]. Alternatively, it can be accessed from the outposts in ''Ancient Temple of Records'' ({{Elyos}}) and ''Ancient Red Tree Forest'' ({{Asmo}}) if the respective faction controls it. This gigantic facility was built by Lakrum's [[Jotun]] to forge their weapons, but was seized by the [[Ereshkigal Army|Frigida Legion]] upon Ereshkigal's occupation. |
| − | Currently, it rewards |
+ | Currently, it rewards decent high tier PvE gear along with [[Infernal Drakenspire Depths]]; the {{ultimate|Ultimate Skyflame}} and {{Legendary|Legendary Skyflame}} sets. The {{ancient|Ancient Winter's Pyre}} set is also available as a lesser tier of gear and is generally taken as free-for-all. |
| + | |||
| + | With the 7.0 update, the instance now comes with a hard mode version called '''Primeth's Forge (Hard)''', accessible from the entrance in the centre of Lakrum, by selecting the appropriate option. The structure and normal mobs are the same, but bosses will deal considerably more damage, have additional mechanics and drop materials used for crafting much more powerful PvE gear. |
||
== Backstory == |
== Backstory == |
||
| Line 12: | Line 14: | ||
== Walkthrough == |
== Walkthrough == |
||
| ⚫ | Generally, the only requirement, other than appropriately geared DPS classes, is a healer. The instance is mostly easily accessible as long as the group has decent gear. Self-resurrection is disabled in several parts of the instance as a measure to prevent players from training through the instance. |
||
| − | Mobs in this instance will inflict considerably more damage than other endgame instances, requiring to be cautious when pulling mobs as being overwhelmed by them is easy. More experienced groups will have less issue with this. The final and main boss of the instance, {{npc|Frigida}} has a lot higher stat requirements than others. Generally, the only requirement for her fight, other than appropriately geared DPS classes, are two healers, as healing can get quite tedious during certain phases. |
||
| − | |||
| ⚫ | |||
The group will zone in in the ''Workshop Entrance''. Here they will find {{Npc|Atis}}/{{Npc|Rith}}, offering some of the instance's quests. Following the straight path will lead them to the first chamber of the instance. |
The group will zone in in the ''Workshop Entrance''. Here they will find {{Npc|Atis}}/{{Npc|Rith}}, offering some of the instance's quests. Following the straight path will lead them to the first chamber of the instance. |
||
| Line 22: | Line 22: | ||
=== Lym Ore Storage Entrance === |
=== Lym Ore Storage Entrance === |
||
| − | The first named boss can be found here; {{Npc|Yastikan}}. Despite his presence, it is a very simple and easy fight. The only |
+ | The first named boss can be found here; {{Npc|Yastikan}}. Despite his presence, it is a very simple and easy fight. The only skills used by him are {{Skill|Sharp Fang}} and {{Skill|Poison Sting}}, both inducing a bleeding state on the target which cannot be removed, as well as {{Skill|Ice Orb}} (a single target stun). Once dead, the door to the ''Lym Ore Storage'' will open. The group may choose instead to use the secret passage way (opened by succeeding the door puzzle), completely avoiding that room. |
Both paths will eventually meet at the ''Lym Ore Grinder'' chamber. |
Both paths will eventually meet at the ''Lym Ore Grinder'' chamber. |
||
=== Lym Ore Grinder === |
=== Lym Ore Grinder === |
||
| − | This is a corridor connecting six rooms together, each one holding a {{Object|Lym Ore Grinder}} inside. In the middle of the hallway, {{Npc| |
+ | This is a corridor connecting six rooms together, each one holding a {{Object|Lym Ore Grinder}} inside. In the middle of the hallway, {{Npc|Gursh}} will be patrolling back and forth. The objective here is to destroy the two {{Object|Lym Ore Grinder}} to open the way into the following room. If the group manages to do it within the time limit given ('''3 minutes'''), an additional loot chest, containing a piece of the {{Ancient|Ancient Obsidian}} set, will appear on the other side of the door. |
| − | The intention is to engage with {{Npc| |
+ | The intention is to engage with {{Npc|Gursh}} and force him to use his AoE skill, {{Skill|Shock Wave}}, near the {{Object|Lym Ore Grinder}}. This will damage and eventually destroy the {{Object|Lym Ore Grinder}}. This will open the door at the end of the hallway. This can be tricky to pull off as {{Npc|Gursh|Gursh's}} attack deals a lot of damage. And on top of that, the hallway is congested with several other lesser guards. Whoever is chosen to train {{Npc|Gursh}} to the grinder must either be tanky and/or have the ability to heal themselves easily, while the rest of the group deals with any other mobs. If the group fails, they may simply destroy the {{Object|Lym Ore Grinder}} themselves, albeit with no additional chest. |
With the {{Object|Lym Ore Grinder}} destroyed, it is best to sprint to the following room, ignoring any other mobs, forcing them to reset once ''Primeth Workstation'' is reached. |
With the {{Object|Lym Ore Grinder}} destroyed, it is best to sprint to the following room, ignoring any other mobs, forcing them to reset once ''Primeth Workstation'' is reached. |
||
=== Primeth Workstation === |
=== Primeth Workstation === |
||
| − | In this room, the group must battle against {{npc|Primeth|Suffering Primeth}}, who is being mind-controlled. This is another short and easy fight. The fight will end after a certain percentage of the boss' HP has been lost. {{npc|Primeth}} will then return to his senses and aid the group for the rest of the instance opening certain passageways. After this fight, a chest containing a piece of the {{Ancient|Ancient Obsidian}} set. His only |
+ | In this room, the group must battle against {{npc|Primeth|Suffering Primeth}}, who is being mind-controlled. This is another short and easy fight. The fight will end after a certain percentage of the boss' HP has been lost. {{npc|Primeth}} will then return to his senses and aid the group for the rest of the instance opening certain passageways. After this fight, a chest containing a piece of the {{Ancient|Ancient Obsidian}} set. His only skill will be {{skill|Detaining Sphere}} (causing an aerial thrust state on all players). |
Once the path opens up, the second puzzle door will be available, allowing players to fully skip the ''Dissolving Room Passage Way''. Failing this puzzle door will force the group to go through it. |
Once the path opens up, the second puzzle door will be available, allowing players to fully skip the ''Dissolving Room Passage Way''. Failing this puzzle door will force the group to go through it. |
||
| Line 42: | Line 42: | ||
=== Primeth Furnace === |
=== Primeth Furnace === |
||
| − | Resurrection in this room is impossible. Doing so will return the player to the ''Lym Ore Dissolving Room''. This chamber holds the last and main boss of the instance |
+ | Resurrection in this room is impossible. Doing so will return the player to the ''Lym Ore Dissolving Room''. This chamber holds the last and main boss of the instance. |
| − | The battle against {{npc|Frigida}} |
+ | The battle against {{npc|Frigida}} is mostly simple, but require to be attentive. Her usual skills will be {{Skill|Frozen Smash}} (a single target attack) and {{Skill|Ice Needle Wild Shot}} (causes an irremovable [[bleeding]] state on all players). She will also phase out and reappear occasionally. She will also use {{Skill|Frost Blast}}, a 2 minute long debuff which damages over time and drains [[MP]], which cannot be removed. On top of this, whenever the "''Frosty Explosion''" bar fills up (located on the the top-right corner of the screen), certain sections of the floor will light up and deal heavy damage on those who stand on them. |
| + | Her biggest skills are {{Skill|Ice-Bladed Arrow}} (short-range AoE attack) and {{Skill|Ice Tin}} (AoE damage affecting people further than 20m away). If a player is hit by these AoEs, they will instantly die. The group must position themselves accordingly to avoid damage. |
||
| − | Upon reaching 50% HP, she will paralyse all players, awaken and transform into dragon-drakan hybrid and will become much more of a menace. {{npc|Frigida|Maddened Frigida}} will constantly have {{Skill|Frost Armor}} up, damaging the attacker with a certain chance with each attack. She will start with {{Skill|Claws of Cold}} (single target attack), {{Skill|Gruesome Wind}} (all players lose MP overtime and have their attack power reduced for 1 minute), {{Skill|Bitter Whirlwind}} (cone-shaped frontal AoE attack), {{Skill|Crystal Thorn Arrow}} (damages players within 20m), {{Skill|Mighty Arrow}} (deals damage on the target and others near it) and {{Skill|Frost Blast}} again. |
||
| − | In addition to all her devastating attacks, every certain amount of time, she will summon three guards; a '''Sorcerer''' and two '''Warriors'''. They deal a lot of damage, so they must be taken down fast. The best strategy is to take down the Sorcerer first and then focus on the Warriors. Their appearance is signalled by the appearance of a rift in one of the corners of the arena. This is where the support classes must dish out their strongest protection buffs |
+ | In addition to all her devastating attacks, every certain amount of time, she will summon three guards; a '''Sorcerer''' and two '''Warriors'''. They deal a lot of damage, so they must be taken down fast. The best strategy is to take down the Sorcerer first and then focus on the Warriors. Their appearance is signalled by the appearance of a rift in one of the corners of the arena. This is where the support classes must dish out their strongest protection buffs. |
After the additional mobs begin spawning, it is best to deal as much damage as possible. The less the fight lasts, the less likely the group will be overwhelmed by all her skills and damage. Death is not an option as resurrection is disabled. |
After the additional mobs begin spawning, it is best to deal as much damage as possible. The less the fight lasts, the less likely the group will be overwhelmed by all her skills and damage. Death is not an option as resurrection is disabled. |
||
| − | If the group manages to survive and overcome {{npc| |
+ | If the group manages to survive and overcome {{npc|Frigida}}, they may loot the instance's main reward from her corpse. |
| + | |||
| + | == Hard Mode == |
||
| + | Most of the instance will work as its regular counterpart. The difference lies in the bosses, offering a much higher difficulty and more mechanics. |
||
| + | |||
| + | === Berserking Yastikan === |
||
| + | The fight will start off with {{Npc|Yastikan|Berserking Yastikan}} using its two normal skills; {{Skill|Sharp Fang}}, {{Skill|Poison Sting}} and {{Skill|Ice Orb}}, which will not affect players that much. He will however gain the ability to use {{Skill|Piercing Needle}}, an attack which will deal damage on a target and others around it. The issue lies in that damage is spread between all targets hit by it. Tanking the skill alone will instantly kill the player. As such, whenever it is used, the tanking player must run back towards the group to share the damage. |
||
| + | |||
| + | After a couple of moments, a secondary boss will spawn along; {{npc|Berserking Varakan}}. His skills will include {{Skill|Freezing Sphere of Revenge}} (AoE damage), {{Skill|Head Wound}} (single target MP drain) and {{Skill|Cold Air Emission}} (frontal AoE damage). He will from time to time pull the entire group towards him with {{Skill|Fetters}}, and follow it up with either {{Skill|Annihilation}} (heavy short range AoE attack) or {{Skill|Losing Rationality}} (short range AoE [[Blind|blindness]]). |
||
| + | |||
| + | After {{npc|Berserking Varakan}} spawns, both him and {{Npc|Yastikan|Berserking Yastikan}} will gain the {{Skill|Enhance Barrier}} buff. The longer the fight takes, the stronger this buff becomes, increasing their attack speed and attack power. It will also fully max out once either of them is killed and the other one remains alive. The appropriate way to approach this is killing them fast (acting as a pseudo-timer) and slaying them at the same time. |
||
| + | |||
| + | Clever positioning is required for this fight. {{Npc|Yastikan|Berserking Yastikan's}} tank will keep him away from the rest of the group, but jumping back close to the group whenever {{Skill|Piercing Needle}} is used. Someone else will also need to be tanking {{npc|Berserking Varakan}}, who will need to be phasing away from both the main group and the other tank. |
||
| + | |||
| + | Once both bosses are dead, a chest containing rewards will appear. |
||
| + | |||
| + | === Suffering Primeth === |
||
| + | Not currently available. |
||
| + | |||
| + | === Berserking Tarukan === |
||
| + | Not currently available. |
||
| + | |||
| + | === Berserking Frigida === |
||
| + | Not currently available. |
||
== Door Puzzle == |
== Door Puzzle == |
||
| Line 200: | Line 223: | ||
== Rewards == |
== Rewards == |
||
| + | === Primeth's Forge === |
||
{| class="article-table" style="margin:auto" |
{| class="article-table" style="margin:auto" |
||
!Source |
!Source |
||
| Line 206: | Line 230: | ||
!Lesser Bosses |
!Lesser Bosses |
||
| |
| |
||
| − | * {{ancient|Ancient |
+ | * {{ancient|Ancient Winter's Pyre}} set (armor, feather accessories, wings) |
| + | * {{legendary|Legendary Skyflame}} set (armor) |
||
* {{Item|Ancient PvE Enchantment Stone Bundle}} |
* {{Item|Ancient PvE Enchantment Stone Bundle}} |
||
|- |
|- |
||
| − | ! |
+ | !Frigida |
| |
| |
||
| − | * {{ultimate|Ultimate |
+ | * {{ultimate|Ultimate Skyflame}} set (armor, wings & feather accessories) |
| − | * {{legendary|Legendary |
+ | * {{legendary|Legendary Skyflame}} set (armor, wings & feather accessories) |
* {{Item|Grade A-B Minium Bundle}} |
* {{Item|Grade A-B Minium Bundle}} |
||
| − | * {{Item|Ancient PvE Enchantment Stone Bundle}} |
+ | * {{Item|Ancient PvE Enchantment Stone Bundle}} |
* {{Item|Legendary PvE Enchantment Stone}} |
* {{Item|Legendary PvE Enchantment Stone}} |
||
| + | * {{item|Complex Silver Cubicle Bundle}} |
||
| − | * {{Item|Monarch's Gemstone}} x2 |
||
* {{Item|Modor Minion Contract}} |
* {{Item|Modor Minion Contract}} |
||
* {{Item|Sheba Minion Contract}} |
* {{Item|Sheba Minion Contract}} |
||
| Line 226: | Line 251: | ||
* {{Item|Saendukal Minion Contract}} |
* {{Item|Saendukal Minion Contract}} |
||
* {{Item|Karemiwen Minion Contract}} |
* {{Item|Karemiwen Minion Contract}} |
||
| + | |} |
||
| + | |||
| + | === Hard Mode === |
||
| + | The {{Item|Ultimate Starlight Soul Stone}} is used as material to craft the {{Ultimate|Royal Heart}} set through [[Morphing]], which can be [[Purification|purified]] into the {{Ultimate|Ultimate Scarlet Flare}} set. |
||
| + | {| class="article-table" style="margin:auto" |
||
| + | !Source |
||
| + | !Rewards |
||
| + | |- |
||
| + | !{{Npc|Yastikan|Berserking Yastikan}} |
||
| + | | rowspan="2" | |
||
| + | * {{Item|Ultimate Starlight Soul Stone}} |
||
| + | * {{item|Complex Golden Cubicle Bundle}} |
||
| + | * {{item|Legendary Manastone Box}} |
||
| + | * {{item|Royal Heart Earring Box}} (rolled) |
||
| + | |- |
||
| + | !{{Npc|Primeth|Suffering Primeth}} |
||
| + | |- |
||
| + | !{{Npc|Tarukan|Berserking Tarukan}} |
||
| + | | |
||
| + | * {{Item|Ultimate Starlight Soul Stone}} |
||
| + | * {{item|Complex Golden Cubicle Bundle}} |
||
| + | * {{item|Legendary Manastone Box}} |
||
| + | * {{item|Royal Heart Waistband Box}} (rolled) |
||
| + | |- |
||
| + | !{{Npc|Frigida|Berserking Frigida}} |
||
| + | | |
||
| + | * {{Item|Ultimate Starlight Soul Stone}} |
||
| + | * {{item|Complex Golden Cubicle Bundle}} |
||
| + | * {{item|Legendary Manastone Box}} |
||
| + | * {{item|Royal Heart Necklace Box}} (rolled) |
||
|} |
|} |
||
| Line 232: | Line 287: | ||
File:PF - Artwork 1.jpg|Concept Art Frigida |
File:PF - Artwork 1.jpg|Concept Art Frigida |
||
File:PF - Artwork 2.png|Concept Art Instance |
File:PF - Artwork 2.png|Concept Art Instance |
||
| + | File:Maddened Frigida.png|Maddened Frigida |
||
</gallery> |
</gallery> |
||
== Trivia == |
== Trivia == |
||
* {{Npc|Frigida}} is the Brigade General of the [[Ereshkigal Army|legion]] who invaded the [[Dredgion Defense|Daeva capitals]]. |
* {{Npc|Frigida}} is the Brigade General of the [[Ereshkigal Army|legion]] who invaded the [[Dredgion Defense|Daeva capitals]]. |
||
| − | * Looting {{Ultimate}} or {{Legendary}} grade items (gear or [[enchantment stones]]) from {{npc| |
+ | * Looting {{Ultimate}} or {{Legendary}} grade items (gear or [[enchantment stones]]) from {{npc|Frigida}} will display a region-wide message for all players present in Lakrum at the time, even those of the opposing race. |
| + | *After 7.0, Primeth's Forge received a drastic decrease in difficulty, making it more accessible. |
||
| + | **All mobs had their defence stats adjusted. |
||
| + | **The fight against {{npc|Frigida}} originally consisted of two phases. The first one being similar to the current one but with more skills. The second one being against {{npc|Frigida|Maddened Frigida}}, a Dragon-Drakan hybrid version of her, with similar mechanics to the current one. |
||
* The instance is referred to as "''idf7''" in files. |
* The instance is referred to as "''idf7''" in files. |
||
| + | * The hard mode version of the instance was added little by little. First it was the lesser bosses, and finally {{Npc|Frigida|Berserking Frigida}} herself. |
||
{{Instance nav|group}} |
{{Instance nav|group}} |
||
Latest revision as of 05:59, 15 November 2019
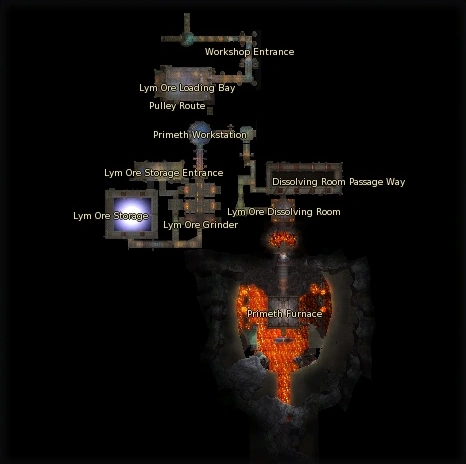
Primeth's Forge map
Primeth's Forge (PF), also called Prometun's Workshop, is a 6-player group instance for players of level 80 and above. Introduced in 6.0, it is accessible from Endorim Temple, central area of Lakrum. Alternatively, it can be accessed from the outposts in Ancient Temple of Records (![]() Elyos) and Ancient Red Tree Forest (
Elyos) and Ancient Red Tree Forest (![]() Asmodian) if the respective faction controls it. This gigantic facility was built by Lakrum's Jotun to forge their weapons, but was seized by the Frigida Legion upon Ereshkigal's occupation.
Asmodian) if the respective faction controls it. This gigantic facility was built by Lakrum's Jotun to forge their weapons, but was seized by the Frigida Legion upon Ereshkigal's occupation.
Currently, it rewards decent high tier PvE gear along with Infernal Drakenspire Depths; the Ultimate Skyflame and Legendary Skyflame sets. The Ancient Winter's Pyre set is also available as a lesser tier of gear and is generally taken as free-for-all.
With the 7.0 update, the instance now comes with a hard mode version called Primeth's Forge (Hard), accessible from the entrance in the centre of Lakrum, by selecting the appropriate option. The structure and normal mobs are the same, but bosses will deal considerably more damage, have additional mechanics and drop materials used for crafting much more powerful PvE gear.
Backstory[]
Formerly the land of the Jotun, Lakrum was a strong source of lym ore, a resource extremely useful as fuel for their machinery. It was centuries later where the region was taken by the Ereshkigal army, as well as their main refinery, led by <Primeth>. <Brigade General Frigida'sFrigida> presence in the captured workshop caused the remaining Jotun workers to be enslaved and continue their duties under her command. Frigida, following orders of Ereshkigal herself, watched over as a weapon was crafted by the Jotun; a glove that changed size depending on its user.
Daevas were however soon alerted of this facility, and mounted an operation to infiltrate the refinery and free more of Lakrum from Balaur occupation. With the aid of Atis/Rith, a renowned researcher new to the region, Daevas entered the workshop. After freeing <Primeth> and other Jotun from <Frigida'sFrigida> control, the brigade general was slain, making the mission a success.
While the tyranny of <Brigade General FrigidaFrigida> was over after the Daeva's infiltration, a shadowy presence took advantage of it. The seemingly clueless researcher aiding on the advance was just a disguise, worn by Beritra to gain possession of the masterwork weapon crafted by the Jotun of Lakrum.
Walkthrough[]
Generally, the only requirement, other than appropriately geared DPS classes, is a healer. The instance is mostly easily accessible as long as the group has decent gear. Self-resurrection is disabled in several parts of the instance as a measure to prevent players from training through the instance.
The group will zone in in the Workshop Entrance. Here they will find Atis/Rith, offering some of the instance's quests. Following the straight path will lead them to the first chamber of the instance.
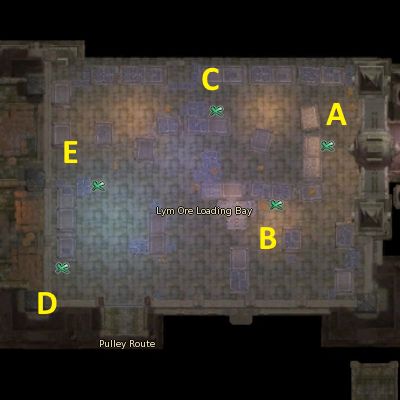
Lym Ore Loading Bay[]
A small maze-like chamber, here the group must traverse through the narrow passages between the crates all the way to the south-west platform. A mini boss, <Frigida Captain>, will be roaming nearby. Defeating him is required to open the gate and access the <Grappling Hook>, used to access the following section.
Lym Ore Storage Entrance[]
The first named boss can be found here; <Yastikan>. Despite his presence, it is a very simple and easy fight. The only skills used by him are ![]() <Sharp Fang> and
<Sharp Fang> and ![]() <Poison Sting>, both inducing a bleeding state on the target which cannot be removed, as well as
<Poison Sting>, both inducing a bleeding state on the target which cannot be removed, as well as ![]() <Ice Orb> (a single target stun). Once dead, the door to the Lym Ore Storage will open. The group may choose instead to use the secret passage way (opened by succeeding the door puzzle), completely avoiding that room.
<Ice Orb> (a single target stun). Once dead, the door to the Lym Ore Storage will open. The group may choose instead to use the secret passage way (opened by succeeding the door puzzle), completely avoiding that room.
Both paths will eventually meet at the Lym Ore Grinder chamber.
Lym Ore Grinder[]
This is a corridor connecting six rooms together, each one holding a <Lym Ore Grinder> inside. In the middle of the hallway, <Gursh> will be patrolling back and forth. The objective here is to destroy the two <Lym Ore Grinder> to open the way into the following room. If the group manages to do it within the time limit given (3 minutes), an additional loot chest, containing a piece of the Ancient Obsidian set, will appear on the other side of the door.
The intention is to engage with <Gursh> and force him to use his AoE skill, ![]() <Shock Wave>, near the <Lym Ore Grinder>. This will damage and eventually destroy the <Lym Ore Grinder>. This will open the door at the end of the hallway. This can be tricky to pull off as <Gursh'sGursh> attack deals a lot of damage. And on top of that, the hallway is congested with several other lesser guards. Whoever is chosen to train <Gursh> to the grinder must either be tanky and/or have the ability to heal themselves easily, while the rest of the group deals with any other mobs. If the group fails, they may simply destroy the <Lym Ore Grinder> themselves, albeit with no additional chest.
<Shock Wave>, near the <Lym Ore Grinder>. This will damage and eventually destroy the <Lym Ore Grinder>. This will open the door at the end of the hallway. This can be tricky to pull off as <Gursh'sGursh> attack deals a lot of damage. And on top of that, the hallway is congested with several other lesser guards. Whoever is chosen to train <Gursh> to the grinder must either be tanky and/or have the ability to heal themselves easily, while the rest of the group deals with any other mobs. If the group fails, they may simply destroy the <Lym Ore Grinder> themselves, albeit with no additional chest.
With the <Lym Ore Grinder> destroyed, it is best to sprint to the following room, ignoring any other mobs, forcing them to reset once Primeth Workstation is reached.
Primeth Workstation[]
In this room, the group must battle against <Suffering PrimethPrimeth>, who is being mind-controlled. This is another short and easy fight. The fight will end after a certain percentage of the boss' HP has been lost. <Primeth> will then return to his senses and aid the group for the rest of the instance opening certain passageways. After this fight, a chest containing a piece of the Ancient Obsidian set. His only skill will be ![]() <Detaining Sphere> (causing an aerial thrust state on all players).
<Detaining Sphere> (causing an aerial thrust state on all players).
Once the path opens up, the second puzzle door will be available, allowing players to fully skip the Dissolving Room Passage Way. Failing this puzzle door will force the group to go through it.
Lym Ore Dissolving Room[]
Both ways will meet in this room, where players will meet another boss; <Tarukan>, another short and straightforward boss fight with no special mechanics. Defeating him will open the way into the Bellow Air Duct, where the group must glide down the tunnel to reach the Primeth Furnace, the last chamber of the instance. Several platforms will be in the way in case a player lacks flight time.
Primeth Furnace[]
Resurrection in this room is impossible. Doing so will return the player to the Lym Ore Dissolving Room. This chamber holds the last and main boss of the instance.
The battle against <Frigida> is mostly simple, but require to be attentive. Her usual skills will be ![]() <Frozen Smash> (a single target attack) and
<Frozen Smash> (a single target attack) and ![]() <Ice Needle Wild Shot> (causes an irremovable bleeding state on all players). She will also phase out and reappear occasionally. She will also use
<Ice Needle Wild Shot> (causes an irremovable bleeding state on all players). She will also phase out and reappear occasionally. She will also use ![]() <Frost Blast>, a 2 minute long debuff which damages over time and drains MP, which cannot be removed. On top of this, whenever the "Frosty Explosion" bar fills up (located on the the top-right corner of the screen), certain sections of the floor will light up and deal heavy damage on those who stand on them.
<Frost Blast>, a 2 minute long debuff which damages over time and drains MP, which cannot be removed. On top of this, whenever the "Frosty Explosion" bar fills up (located on the the top-right corner of the screen), certain sections of the floor will light up and deal heavy damage on those who stand on them.
Her biggest skills are ![]() <Ice-Bladed Arrow> (short-range AoE attack) and
<Ice-Bladed Arrow> (short-range AoE attack) and ![]() <Ice Tin> (AoE damage affecting people further than 20m away). If a player is hit by these AoEs, they will instantly die. The group must position themselves accordingly to avoid damage.
<Ice Tin> (AoE damage affecting people further than 20m away). If a player is hit by these AoEs, they will instantly die. The group must position themselves accordingly to avoid damage.
In addition to all her devastating attacks, every certain amount of time, she will summon three guards; a Sorcerer and two Warriors. They deal a lot of damage, so they must be taken down fast. The best strategy is to take down the Sorcerer first and then focus on the Warriors. Their appearance is signalled by the appearance of a rift in one of the corners of the arena. This is where the support classes must dish out their strongest protection buffs.
After the additional mobs begin spawning, it is best to deal as much damage as possible. The less the fight lasts, the less likely the group will be overwhelmed by all her skills and damage. Death is not an option as resurrection is disabled.
If the group manages to survive and overcome <Frigida>, they may loot the instance's main reward from her corpse.
Hard Mode[]
Most of the instance will work as its regular counterpart. The difference lies in the bosses, offering a much higher difficulty and more mechanics.
Berserking Yastikan[]
The fight will start off with <Berserking YastikanYastikan> using its two normal skills; ![]() <Sharp Fang>,
<Sharp Fang>, ![]() <Poison Sting> and
<Poison Sting> and ![]() <Ice Orb>, which will not affect players that much. He will however gain the ability to use Piercing Needle, an attack which will deal damage on a target and others around it. The issue lies in that damage is spread between all targets hit by it. Tanking the skill alone will instantly kill the player. As such, whenever it is used, the tanking player must run back towards the group to share the damage.
<Ice Orb>, which will not affect players that much. He will however gain the ability to use Piercing Needle, an attack which will deal damage on a target and others around it. The issue lies in that damage is spread between all targets hit by it. Tanking the skill alone will instantly kill the player. As such, whenever it is used, the tanking player must run back towards the group to share the damage.
After a couple of moments, a secondary boss will spawn along; Berserking Varakan. His skills will include Freezing Sphere of Revenge (AoE damage), ![]() <Head Wound> (single target MP drain) and Cold Air Emission (frontal AoE damage). He will from time to time pull the entire group towards him with Fetters, and follow it up with either Annihilation (heavy short range AoE attack) or Losing Rationality (short range AoE blindness).
<Head Wound> (single target MP drain) and Cold Air Emission (frontal AoE damage). He will from time to time pull the entire group towards him with Fetters, and follow it up with either Annihilation (heavy short range AoE attack) or Losing Rationality (short range AoE blindness).
After Berserking Varakan spawns, both him and <Berserking YastikanYastikan> will gain the Enhance Barrier buff. The longer the fight takes, the stronger this buff becomes, increasing their attack speed and attack power. It will also fully max out once either of them is killed and the other one remains alive. The appropriate way to approach this is killing them fast (acting as a pseudo-timer) and slaying them at the same time.
Clever positioning is required for this fight. <Berserking Yastikan'sYastikan> tank will keep him away from the rest of the group, but jumping back close to the group whenever Piercing Needle is used. Someone else will also need to be tanking Berserking Varakan, who will need to be phasing away from both the main group and the other tank.
Once both bosses are dead, a chest containing rewards will appear.
Suffering Primeth[]
Not currently available.
Berserking Tarukan[]
Not currently available.
Berserking Frigida[]
Not currently available.
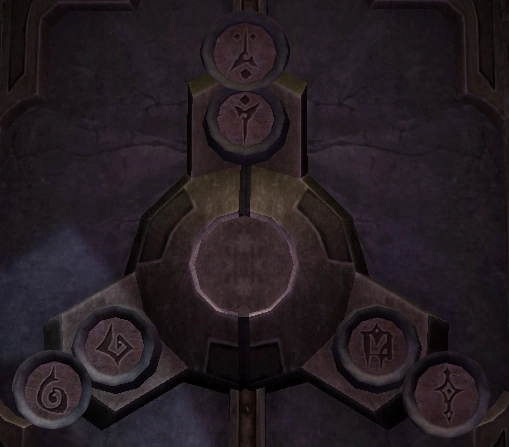
Door Puzzle[]
Across the instance, there will be two doors which can be unlocked by finding the correct combinations of glyphs. Unlocking them allows the group to skip unneeded rooms. The first one is located in the Lym Storage Entrance, before fighting <Yastikan>. The second one is located in a small hallway after freeing <Primeth> in Primeth Workstation and having him open the way.
The door has three slots, each one showing three different glyphs at a time. Different glyphs can be shown by interacting with each slot. Interacting with the centrepiece will confirm the confirmation and use up one attempt (and open if its the correct one). The difficulty with this puzzle is that a group may only attempt three times a combination in order to open the door. Otherwise, it will not open at all and the group will be forced to go the long way around.
Combinations[]
Each slot has two possible glyphs associated with them:
 | ||||
| Combination | Floor Tile | Respective | Possible Tiles | |
|---|---|---|---|---|
| A |  |
 |
 |
 |
| B |  |
 |
|
|
| C | |
|
|
|
| D | |
|
|
|
The group is only given one of the three glyphs required for the correct combination. This one is found on the floor in specific locations previous to the door. They can be easy to miss if not paying attention, especially considering how they can sometimes be locked behind points-of-no-return (unless they exit and reenter the instance or resurrecting back at the start).
This glyph found on the floor will be used to determine another glyph of the correct combination on the door. The glyph on the floor will be either on the top slot or the slot on the right. Depending on the glyph found, the glyph on opposite slot will have a respective glyph. For example, if the glyph found on the floor tile is "Earth" (square-ish one), then it must be inputted on the right slot, meaning the correct glyph for the top slot will be "Shadow" (staff with a dot on top).
The remaining glyph, the one on the left slot, can only be found by a 50-50 chance. Players must just force it by choosing any of the two possible glyphs, attempting the other glyph if it fails. Because of the three attempts, the instance gives players enough chances.
Glyph Locations[]
- First Door
| Location | Description | |
|---|---|---|
 |
A | In the corner, behind Troubled Atis/Troubled Rith. |
| B | Immediately after the small stairway, left side. | |
| C | In the platform between the two main stairs. Between the ore crates. | |
| D | Middle of the platform in the middle of the last stairs. | |
| E | Down the stairs, next to the ore crates in the corner. Usually with lesser mobs standing on top of it. | |
 |
A | Immediately after entering, in front. Usually with lesser mobs standing on top of it. |
| B | Left path upon entering, and then taking a right. Right in front of an ore crate. | |
| C | Right path upon entering. In a corner made by two shelves. | |
| D | Near the <Grappling Hook>. In the corner next to the wizard mob. | |
| E | Left end of the room. In front of a single shelf. | |
 |
A | Upon being teleported, before jumping down, check the corner next to the puzzle door. (Left side) |
| B | Next to <Yastikan>. | |
- Second Door
| Location | Description | |
|---|---|---|
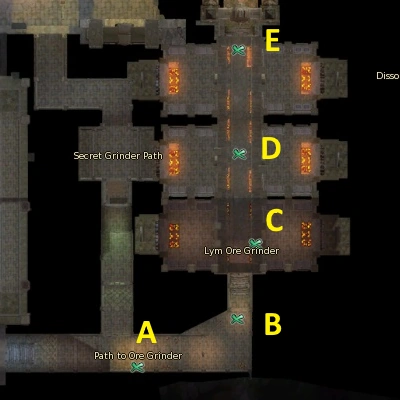 |
A | Side of the main path. |
| B | Middle of the path immediately before entering the Lym Ore Grinder. | |
| C | Middle path in Lym Ore Grinder, in front of the right door. | |
| D | Middle path in Lym Ore Grinder, in the middle of the room. | |
| E | Middle path in Lym Ore Grinder, in the middle, before going up the steps to exit the chamber. | |
 |
A | Immediately before jumping down to fight <Suffering PrimethPrimeth>, down the steps to the right. |
| B | Right in the middle of the chamber, Primeth Workstation. | |
 |
A | In between the wall and the ground torch to the left, next to the stairs. |
| B | Same room as the second puzzle door, on the opposite side, between a few barrels. | |
| C | Same room as the second puzzle door, next to a pillar next to it. | |
Quests[]
- Elyos
 [Instanced Dungeon/Group] Forge Under Fire [?]
- [Instanced Dungeon/Group] Lym Ore Mystery [?]
- [Instanced Dungeon/Group] Balaur, Blacksmiths, and Blueprints [?]
- [Instanced Dungeon/Group] Hammer Down [?]
- Asmodians
- [Instanced Dungeon/Group] At Primeth's Forge [?]
- [Instanced Dungeon/Group] Chasing Down Ore [?]
- [Instanced Dungeon/Group] Freeing the Jotun [?]
- [Instanced Dungeon/Group] Hammer Down [?]
Rewards[]
Primeth's Forge[]
| Source | Rewards |
|---|---|
| Lesser Bosses |
|
| Frigida |
|
Hard Mode[]
The File:Ultimate Starlight Soul Stone.gif Ultimate Starlight Soul Stone is used as material to craft the Royal Heart set through Morphing, which can be purified into the Ultimate Scarlet Flare set.
| Source | Rewards |
|---|---|
| <Berserking YastikanYastikan> |
|
| <Suffering PrimethPrimeth> | |
| <Berserking TarukanTarukan> |
|
| <Berserking FrigidaFrigida> |
|
Gallery[]
")
")
")
Trivia[]
- <Frigida> is the Brigade General of the legion who invaded the Daeva capitals.
- Looting Ultimate or Legendary grade items (gear or enchantment stones) from <Frigida> will display a region-wide message for all players present in Lakrum at the time, even those of the opposing race.
- After 7.0, Primeth's Forge received a drastic decrease in difficulty, making it more accessible.
- All mobs had their defence stats adjusted.
- The fight against <Frigida> originally consisted of two phases. The first one being similar to the current one but with more skills. The second one being against <Maddened FrigidaFrigida>, a Dragon-Drakan hybrid version of her, with similar mechanics to the current one.
- The instance is referred to as "idf7" in files.
- The hard mode version of the instance was added little by little. First it was the lesser bosses, and finally <Berserking FrigidaFrigida> herself.