
|
This article is archived. The content on this page was relevant to a previous version of Aion, and has since either been removed from the game or never was included in the public version. Please do not use this article for critical in-game information! |
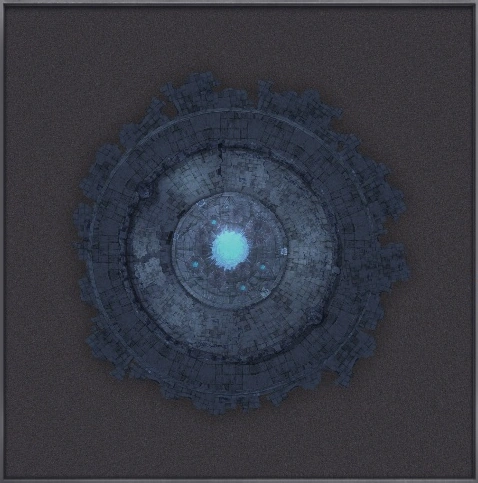
Infinity Shard map
The Infinity Shard (KR/EU: Katalamize) was a 12-man alliance instance for players of level 65 and above, introduced in 4.0. The entrance was originally located in the Idian Depths, but was later moved to the Flameberth Downs in Levinshor. This instance was removed from the game with the 6.0 update.
This hangar, a fragmented space, existed between dimensions and was where the Danuar hid their last most powerful weapon; <Hyperion>.
Background[]
The desperate Danuar, expecting a final strike from Tiamat which would doom their race forever, decided that they would not fall. They used their previous inventions as the basis for the design of a new, superior weapon. Over time they designed a small army of petraliths, powered by Ide, which they called Hyperions.
Scattered across Katalam, these petraliths stood up as their hope. Unfortunately, due to the Balaur's constant assaults on their lands, the project had been continuously set back, and as a result the Danuar never got the chance to deploy their ultimate weapons. The few remaining Danuar in the Idian Depths had set up a hangar for the Hyperions, which, fearing they would fall under the Dragon Lord's claws, was destroyed to put other races in the same danger they were in, leaving only one stone giant behind.
After the Danuar race was exterminated, Tiamat eventually found the last working Hyperion by discovering a special portal in the underground of Katalam. To her surprise, it was not ready to be activated as its power source had been tampered with. She sent a request for help to Fregion, but Beritra intercepted and silenced her messenger, sealing Tiamat's doom.
By now Beritra began to take over the lands of Katalam previously occupied by Tiamat. As he made his way to the last Hyperion he found himself in a similar position as predecessor. As a result, he deployed his researchers all over Katalam to acquire Danuar records pertaining to secrets of Ide, which should allow him to reactivate the Hyperion. After pillaging old tombs, facilities and making some own experiments, Beritra's efforts proved to be a success. He managed to trick a certain Daeva into re-activating the weapon, which he then took for himself.
As a response, Daevas were sent to this hangar to put an end to the imminent threat this posed. Destroying it would be the only option, despite of how beneficial this warmachine would be for Elyos or Asmodians.
Walkthrough[]

Ide Pools
The instance consists of a circular room with two opposing ramps and platforms which appear after them. In the middle of the room down the ramps, there will be small blue Ide pools which will cause players to gain the ![]() <Eroded Ide> debuff, decreasing movement speed and accuracy. Along them, <Hyperion>, the main and only boss in the instance, will be standing. However, he will be invulnerable to any damage due to his
<Eroded Ide> debuff, decreasing movement speed and accuracy. Along them, <Hyperion>, the main and only boss in the instance, will be standing. However, he will be invulnerable to any damage due to his ![]() <Ide Aetheric Field (Cast)> buff, preventing the fight from starting until all the four <Ide Forcefield Generator> are taken down (which will be invulnerable to damage until all mobs around it have been disposed of).
<Ide Aetheric Field (Cast)> buff, preventing the fight from starting until all the four <Ide Forcefield Generator> are taken down (which will be invulnerable to damage until all mobs around it have been disposed of).
Positioned on four different places and surrounded by a small group of Balaur, most players will go down the ramp they spawn in and clear the guards protecting the first <Ide Forcefield Generator>, however, they will keep it intact. Having done that, they will go back up the ramp to the second generator, slaying the Balaur squad (led by <Agent Kabalash>) and taking down the device. Dropping down from the platform on to the second ramp, the alliance will repeat this strategy twice with the remaining generators, eventually only leaving the first one up. This is a small break for everyone to prepare for the great battle against the petralith.
Before starting, the alliance distribution plays an important role across the fight. The first group, standing alongside the first <Ide Forcefield Generator>, will be consisted of the main tank, a Cleric, melee DPS and, if any, a Chanter. The second group is formed by ranged DPS and a healer.

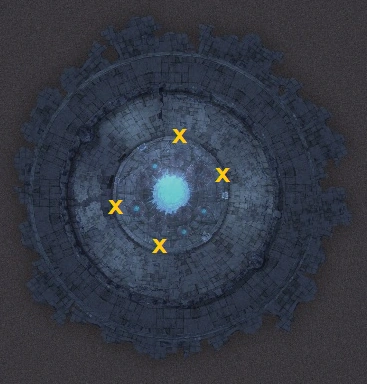
Ide Resonators' spawn points
A very important role however, is assigning someone to act as an <Ide Resonator> destroyer. These Idgel Cubes will appear on the air during the fight, which will buff <Hyperion> with the ![]() <Attack Boost> buff, increasing his offensive attributes. Once the <Ide Resonator> finishes casting its buff, it will gain the
<Attack Boost> buff, increasing his offensive attributes. Once the <Ide Resonator> finishes casting its buff, it will gain the ![]() <Ide Aetheric Field (Cast)> buff, making it invulnerable to damage with no way of removing it. Each buff makes the boss stronger, however, the ultimate menace is if the four of them manage to buff them, which results in the boss nuking everyone in the instance and fleeing, putting an end to the instance. Out of the four, the alliance will only need to assign this person to focus on two of the Resonators, most usually the ones on the north of the map. This player will also need to destroy certain turrets which spawn on the platforms around their location.
<Ide Aetheric Field (Cast)> buff, making it invulnerable to damage with no way of removing it. Each buff makes the boss stronger, however, the ultimate menace is if the four of them manage to buff them, which results in the boss nuking everyone in the instance and fleeing, putting an end to the instance. Out of the four, the alliance will only need to assign this person to focus on two of the Resonators, most usually the ones on the north of the map. This player will also need to destroy certain turrets which spawn on the platforms around their location.
Since the buffs are not particularly major, most usually alliances assign only one player to take down two resonators, leaving the other two on the other side alone. This one player is usually moved to a separate group as this person will not go down from its platform or damage <Hyperion>. This is because if this player were to attack the boss, there would be a chance of him targeting the player and either blast them with its random-target attacks or reset due to the player being out of its reach.
Once the party is ready and positioned, Group One will begin taking down the first <Ide Forcefield Generator>. Once done, <Hyperion>'s fight will begin, giving the players 20 minutes to kill the warmachine (which when failed will also end instance). The tank will step in first as <Hyperion> casts casts ![]() <Powerful Energy Blast> (a strong multi-target attack affecting all enemies near the target) three times. Once those three attacks have been performed, the DPS shall begin its task. This is to ensure the tank builds up aggro on the boss. If a Chanter is present, the player may make use of
<Powerful Energy Blast> (a strong multi-target attack affecting all enemies near the target) three times. Once those three attacks have been performed, the DPS shall begin its task. This is to ensure the tank builds up aggro on the boss. If a Chanter is present, the player may make use of ![]() <Elemental Screen I> and/or
<Elemental Screen I> and/or ![]() <Block Curtain> to aid the tank mitigate some damage. Once done, the player will have to switch to Group Two and cast
<Block Curtain> to aid the tank mitigate some damage. Once done, the player will have to switch to Group Two and cast ![]() <Word of Quickness I> when in range, and then switch back to Group One.
<Word of Quickness I> when in range, and then switch back to Group One.
Across the fight, the petralith will constantly use ![]() <Falling Strike>, a single target attack, and
<Falling Strike>, a single target attack, and ![]() <Ide Energy Blast>, similar to
<Ide Energy Blast>, similar to ![]() <Powerful Energy Blast>, which will sometimes be casted while targeting other players than the tank. Whenever this happens, players should make some distance from the targeted player to avoid unnecessary damage.
<Powerful Energy Blast>, which will sometimes be casted while targeting other players than the tank. Whenever this happens, players should make some distance from the targeted player to avoid unnecessary damage.
At 80% of HP, the boss will widen its arsenal. He will begin using ![]() <Eerie Howl>, an all-room wide AoE attack which deals damage on all the affected enemies, as well as raising the caster's Physical Defence. This marks the appearance of a wave of additional Balaur monsters. At this point on the fight, these mobs will consist of only one Balaur running down from the ramp and a series of Summoned Ancient Tyrhund on the bottom. However, as the fight progresses, the number will increase.
<Eerie Howl>, an all-room wide AoE attack which deals damage on all the affected enemies, as well as raising the caster's Physical Defence. This marks the appearance of a wave of additional Balaur monsters. At this point on the fight, these mobs will consist of only one Balaur running down from the ramp and a series of Summoned Ancient Tyrhund on the bottom. However, as the fight progresses, the number will increase.
While continuing to use the mentioned skills, the boss will also cast ![]() <Cast Ide Energy>, which will drain the MP and deal damage on enemies within a certain of the selected target. This target is randomised; therefore whoever is going to get hit by it will have to move away from the rest of the group to avoid draining their MP. Meanwhile, the tank will also have to watch out for the
<Cast Ide Energy>, which will drain the MP and deal damage on enemies within a certain of the selected target. This target is randomised; therefore whoever is going to get hit by it will have to move away from the rest of the group to avoid draining their MP. Meanwhile, the tank will also have to watch out for the ![]() <Aerial Sweep> and
<Aerial Sweep> and ![]() <Takedown> combo. The first skill will lift the tank into an Aether's Hold state, while the second one will deal an outstanding amount of damage if the target is in the said state. But this can be easily avoided by using
<Takedown> combo. The first skill will lift the tank into an Aether's Hold state, while the second one will deal an outstanding amount of damage if the target is in the said state. But this can be easily avoided by using ![]() <Remove Shock I>, greatly reducing the damage of the second blow.
<Remove Shock I>, greatly reducing the damage of the second blow.
As the battle wears on, ![]() <Eerie Howl> will be used sometimes. Until 60% of HP, where it is followed by
<Eerie Howl> will be used sometimes. Until 60% of HP, where it is followed by ![]() <Ide Aetheric field>, another shield which will immobilise him, but make him immune to any damage. Lasting for 30 seconds, this time should be used by the alliance to take down the high amount of additional monsters spawned. At this point, waves will sometimes be composed of two or more Balaur, making it important to prioritise the focus. All DPS should focus on first taking down any Mage-like mob (being the most dangerous), followed by the Scout-like mobs, then followed by the Priest-like mobs, and finally the Warrior-like mobs (being the most durable). Once the
<Ide Aetheric field>, another shield which will immobilise him, but make him immune to any damage. Lasting for 30 seconds, this time should be used by the alliance to take down the high amount of additional monsters spawned. At this point, waves will sometimes be composed of two or more Balaur, making it important to prioritise the focus. All DPS should focus on first taking down any Mage-like mob (being the most dangerous), followed by the Scout-like mobs, then followed by the Priest-like mobs, and finally the Warrior-like mobs (being the most durable). Once the ![]() <Ide Aetheric field> and the adds are down, everyone may resume their tasks. The shield will continually be popped from time to time at around 50%, 25%, 20% and 10% of HP. It is usually around the second use of
<Ide Aetheric field> and the adds are down, everyone may resume their tasks. The shield will continually be popped from time to time at around 50%, 25%, 20% and 10% of HP. It is usually around the second use of ![]() <Ide Aetheric field> when the Chanter casts
<Ide Aetheric field> when the Chanter casts ![]() <Word of Wind I> on Group One, after the shield is down.
<Word of Wind I> on Group One, after the shield is down.
Nonetheless, at 50% the tank will additionally have to deal with ![]() <Sweeping Strike>, a single target knockdown (which should not be removed with
<Sweeping Strike>, a single target knockdown (which should not be removed with ![]() <Remove Shock I> as it may cause it to be on cooldown when
<Remove Shock I> as it may cause it to be on cooldown when ![]() <Aerial Sweep> is used). The players will also have to watch out for
<Aerial Sweep> is used). The players will also have to watch out for ![]() <Cast Powerful Ide Energy> (a strengthened version of
<Cast Powerful Ide Energy> (a strengthened version of ![]() <Cast Ide Energy>).
<Cast Ide Energy>).
The greatest danger lies after 10% of HP, when <Hyperion> will cast ![]() <Dreadful Howl>, a strengthened version of
<Dreadful Howl>, a strengthened version of ![]() <Eerie Howl>. After a few seconds, this is where the fully DPS potential must begin. A massive amount of adds will begin to spawn after some seconds, making it a race against time to survive the boss' attacks and the Balaur enough to finish the last bits of HP. It is usually here when the Chanter, if present, swaps again to Group Two and use
<Eerie Howl>. After a few seconds, this is where the fully DPS potential must begin. A massive amount of adds will begin to spawn after some seconds, making it a race against time to survive the boss' attacks and the Balaur enough to finish the last bits of HP. It is usually here when the Chanter, if present, swaps again to Group Two and use ![]() <Word of Quickness I>.
<Word of Quickness I>.
If the alliance manages to overcome the last Hyperion, they may then loot his body for two bundles; ![]() <Hyperion's Equipment Box> (rewarding one piece of the instance's eternal or mythic gear) and
<Hyperion's Equipment Box> (rewarding one piece of the instance's eternal or mythic gear) and ![]() <Infinity Shard Expedition's Excavation Box> (holding a crafting recipe, crafting materials, enchantment stones and a
<Infinity Shard Expedition's Excavation Box> (holding a crafting recipe, crafting materials, enchantment stones and a ![]() <Ceramium Medal>). Players may also loot
<Ceramium Medal>). Players may also loot ![]() <Hyperion's Parts>, which can be turned in (once the player gets ten of them) through a quest in Lumewillow Glade Scout Base (E) and Pinnacle Cataract Outpost (A) in Levinshor for a bundle containing eternal equipment. All members will also receive 50 GP for killing the petralith.
<Hyperion's Parts>, which can be turned in (once the player gets ten of them) through a quest in Lumewillow Glade Scout Base (E) and Pinnacle Cataract Outpost (A) in Levinshor for a bundle containing eternal equipment. All members will also receive 50 GP for killing the petralith.
Quests[]
Elyos
 [Alliance] Greater Than the Whole [?]
- Hyperion Intrusion [?]
Asmodian
- [Alliance] Doomsday Weapon [?]
- The Hyperion Awaits [?]
Prizes[]
- Hyperion's eternal weapons, armour and accessories
- Enraged/Incensed Hyperion's mythic weapons and armour
- Enraged Hyperion's Opal accessories (physical)/Enraged Hyperion's Ceramium accessories (magical)
- <Hyperion Wings>
- Crafting materials and recipes
- Enchantment Stones
- <Omega Enchantment Stone>
Trivia[]
- The instance's entrance was originally located on the southern section of the Grand Passage in Idian Depths. However, as of 4.7, the entrance was moved to its current location.
- Upon its release each player would originally need to be in the possession of a <Infinity Shard Waykey> to enter the instance. This entry requirement was removed in 4.5.
- The <Hyperion> fought inside the instance is the same one activated by the player in the final campaign quest in Danaria, which later fell under Beritra's control.
- After 4.8 this is instance is required to upgrade a legion to level 8.