
Bastion of Souls (BoS) (KR/EU: Narakkalli), is a solo instance introduced in 5.5 for players of level 76 and above. The entrance is located in Lakrum, Lebu Forest Scout Post for Elyos and Mysterious Mushroom Dwelling Scout Post for Asmodians. This place is a mystery for Daevas, and after a failed attempt by a expeditionary legion, a strong group of Daevas must venture inside and rescue their missing comrades.
This instance is meant to be the first endgame instance solo experience, awarding the most simple gear; the Ancient Nighthaze set.
Maps[]
")
")
")
")
Backstory[]
- Elyos
Following Sanctum's invasion, several Daevas were reported missing when dust settled down. As the Dredgions retreated, a small legion was tasked to follow the warships back to their hideout somewhere within Ereshkigal's domain. Underpowered, with too few Daevas assisting to this mission, the Arrows of Freedom legion was captured as they infiltrated the Bastion of Souls, with the only survivor being <Bastiel>, their captain, and his own son, <Opel>, being one of the captives.
Having reported his limited findings, a group of Daevas is sent to rescue all missing Daevas and the legionaries. However, the plan was hindered by Ereshkigal's witches, the Harvesters, as the Dragon Lord herself had predicted their arrival. Dragged to a cage, <Bastiel> later emerges to free the Daevas and informs them of the several prisoners held. Cautiously, Daevas proceed to free them, but eventually call the attention of the warden; <Enraged MahoroshMahorosh>.
As Daevas defeat him, his body is found to having held a report, revealing extremely frightening but crucial information. Any prisoners were starved for days until they reach a "purified" state, then tortured in various ways, and finally get their vitality extracted by malevolent roots. Roots which feed and grow a flower of cosmic power; the Incarna.
Unsure of the state of the other prisoners and to put an end to this disturbing plan, the group of Daevas rushes further into the Bastion of Souls, finding how most of the missing legionaries had been sacrificed already. To prevent the bloom from fully grow, Daevas must reach the deepest sanctuary and slay all Harvesters. Battle rages against the Balaur witches, and one by one they fall. Expecting their defeat, one of them, <PridaArrogant Prida>, takes the Incarna bud with her and flees, while the others protect her. Unexpectedly though, they transform the captain's son into a monster, deprived from any will or thoughts. As the creature attacks the Daevas, no other option is left but to put an end to his life. Focused on him, the Harvester witch manages to escape.
While the sacrifices were stopped, captured soldiers freed and the Bastion of Souls cleared, the mission was not a success. A disheartened <Bastiel> thanks the Daevas for their work, and sends them back to the base. With the flower still missing and the amount of casualties, it is only the beginning of something far more dangerous; the return of Dragon Lord Ereshkigal.
- Asmodians
Following Pandemonium's invasion, several Daevas were reported missing when dust settled down. As the Dredgions retreated, a small legion was tasked to follow the warships back to their hideout somewhere within Ereshkigal's domain. Underpowered, with too few Daevas assisting to this mission, the Arrows of Destruction legion was captured as they infiltrated the Bastion of Souls, with the only survivor being <Bastikan>, their captain, and his own son, <Shurak>, being one of the captives.
Having reported his limited findings, a group of Daevas is sent to rescue all missing Daevas and the legionaries. However, the plan was hindered by Ereshkigal's witches, the Harvesters, as the Dragon Lord herself had predicted their arrival. Dragged to a cage <Bastikan> later emerges to free the Daevas and informs them of the several prisoners held. Cautiously, Daevas proceed to free them, but eventually call the attention of the warden; <Enraged MahoroshMahorosh>.
As Daevas defeat him, his body is found to having held a report, revealing extremely frightening but crucial information. Any prisoners were starved for days until they reach a "purified" state, then tortured in various ways, and finally get their vitality extracted by malevolent roots. Roots which feed and grow a flower of cosmic power; the Incarna.
Unsure of the state of the other prisoners and to put an end to this disturbing plan, the group of Daevas rushes further into the Bastion of Souls, finding how most of the missing legionaries had been sacrificed already. To prevent the bloom from fully grow, Daevas must reach the deepest sanctuary and slay all Harvesters. Battle rages against the Balaur witches, and one by one they fall. Expecting their defeat, one of them, <PridaArrogant Prida>, takes the Incarna bud with her and flees, while the others protect her. Unexpectedly though, they transform the captain's son into a monster, deprived from any will or thoughts. As the creature attacks the Daevas, no other option is left but to put an end to his life. Focused on him, the Harvester witch manages to escape.
While the sacrifices were stopped, captured soldiers freed and the Bastion of Souls cleared, the mission was not a success. A disheartened <Bastikan> thanks the Daevas for their work, and sends them back to the base. With the flower still missing and the amount of casualties, it is only the beginning of something far more dangerous; the return of Dragon Lord Ereshkigal.
Walkthrough[]
- This section is not complete. You can help by adding to it.
First and foremost, group composition must include at least one Cleric, as they are the only class allowed to perform certain actions required to progress in the instance. A second support class, such as a Chanter, support Songweaver or another Cleric is strongly advised. The rest of the party may be composed by any other classes; though a CC class of any kind is recommended as well, such as Spiritmaster or Sorcerer, or an AoE DPS class, such as Gladiator or Aethertech.
Path of Rebirth[]
The following section meant to only be a warm up for the alliance. As the group approaches the bridge, a group of Balaur will be guarding the way. Once all of these have been taken down, players will be teleported to the Incarna Prison Camp and the first cutscene will play.
Incarna Prison Camp[]
Players will start in the middle, inside a cage, shortly afterwards being freed by <Bastiel>/<Bastikan>. The area is composed of four floors, each connected through different bridges on the outer parts, and stairs on their central parts. During this section, everyone will be under the effect of ![]() <Sakra's Branding>, reducing offensive and defensive stats by 30%. The debuff can be lifted once the alliance reaches <Mahorosh>, the first boss.
<Sakra's Branding>, reducing offensive and defensive stats by 30%. The debuff can be lifted once the alliance reaches <Mahorosh>, the first boss.
- Rescue Daevas
This part is compulsory for continuing with the instance. There will be a total of ten Daevas imprisoned in each of the three floors. They must all be saved in order to disable the protective shield around <Prison Camp Generator> and access the following areas.
The 4th Floor, 3rd Floor and 2nd Floor each have chambers locked off by a gate. Each gate can only be opened while having the appropriate key. The gates in the 4th Floor can be opened with the ![]() <Purification Chamber Key - 4>, and so on for the
<Purification Chamber Key - 4>, and so on for the ![]() <Purification Chamber Key - 3> and
<Purification Chamber Key - 3> and ![]() <Purification Chamber Key - 2>. Keys are dropped by <Harvesters Drakan Slaughterers> in every floor (can be easily identified by their title).
<Purification Chamber Key - 2>. Keys are dropped by <Harvesters Drakan Slaughterers> in every floor (can be easily identified by their title).
Inside them, players will find prison cells; some empty, others with Daevas. The party must open the ones with Daevas inside by attacking them, while also watching out for mobs spawning overtime. Alternatively, <Harvesters Drakan Butcher Captains> will drop ![]() <Jail Keys>, which when used on the doors, it will open them automatically. However, due to there being less of these than needed jails, most doors will have to be opened by force.
<Jail Keys>, which when used on the doors, it will open them automatically. However, due to there being less of these than needed jails, most doors will have to be opened by force.
Once all Daevas have been saved, the group may proceed to the 1st Floor and destroy the <Prison Camp Generator>. However, they must have first acquired four ![]() <Crude Bombs>, one for each generator. These are dropped by four different named bosses; <Sahidtan> in Storage B - Collapsed, <Manusha> in the Atonement Chamber, <Kargata> in Storage B and <Kramush> in Lift of Enlightenment.
<Crude Bombs>, one for each generator. These are dropped by four different named bosses; <Sahidtan> in Storage B - Collapsed, <Manusha> in the Atonement Chamber, <Kargata> in Storage B and <Kramush> in Lift of Enlightenment.
The strategy, generally, is to pull as many mobs in the same floor at once and kill them all. Once dead, loot every corpse to find the needed items. Usually, one person is designated to keep all the items, making them the only person who can roll on them, while all other players pass on the roll. The pathing for the groups tend to be; using the inner stairs to reach the 2nd Floor, use the outer platforms to reach Storage B - Collapsed and move to the 3rd Floor, use the outer path to 4th Floor, go back to the starting cell, glide towards Storage C, clear the Lift of Enlightenment and, finally, head to the 1st Floor.
- Mahorosh
Once all <Prison Camp Generator> are destroyed, Mahorosh will spawn in the 1st Floor as <Cold MahoroshMahorosh> and alongside <Kudansha>. <Kudansha> is vulnerable to CC skills, but his presence generally too weak to mind him, as he will stick to using ![]() <Area Capture> , pulling people to his location. Meanwhile, <Cold MahoroshMahorosh> will stick to AoEs like
<Area Capture> , pulling people to his location. Meanwhile, <Cold MahoroshMahorosh> will stick to AoEs like ![]() <Brutal Downward Blow>, and from time to time activate the Ice Cannons (areas of the floor which light up will deal damage). While not major, depending on how geared the group is, his combos might be a threat for the less prepared.
<Brutal Downward Blow>, and from time to time activate the Ice Cannons (areas of the floor which light up will deal damage). While not major, depending on how geared the group is, his combos might be a threat for the less prepared.
The group must slay <Cold MahoroshMahorosh> first. Defeating <Kudansha> afterwards is optional, as the door opens just by killing the Warden. His loot table is simple; a random piece of the Ancient Fog set and ![]() <Ancient PvE Enchantment Stone Bundles> for everyone.
<Ancient PvE Enchantment Stone Bundles> for everyone.
Greedy Golmir[]
By jumping on the windstream after defeating <Cold MahoroshMahorosh>, the party will end up in the Path to Serenity. After a few mobs, <Greedy Golmir>, the second boss, can be found, remaining as just a simple optional boss. Most groups will potentially kill <Greedy Golmir> before he wreaks havoc. He will occasionally either summon a Consuming Spirit, which, if ignored for too long, will cast ![]() <Explosion>, exploding and instantly kill everyone instantly, or several smaller spirits which inflict fast and damaging attacks. Upon death, his corpse may be looted for a random piece of the Ancient Fog set and a
<Explosion>, exploding and instantly kill everyone instantly, or several smaller spirits which inflict fast and damaging attacks. Upon death, his corpse may be looted for a random piece of the Ancient Fog set and a ![]() <Ancient PvE Enchantment Stone Bundle> for each member.
<Ancient PvE Enchantment Stone Bundle> for each member.
The path leads to the following section after several Balaur guards.
Incarna Roots (Defense)[]
The objective is to completely restore <Bastiel'sBastiel>/<Bastikan'sBastikan> HP to full while protecting him from waves of mobs. Normal healing skills are ineffective after a certain point. It is crucial to avoid placing a HP buff on him, otherwise lengthening the time required. After around 5 minutes, a full wave of enraged Klaws will spawn, which will easily kill the NPC, acting as a time limit for this task.
There are three different types of mobs which will spawn. Most common ones include <Harvesters Klaw Veteran Sentinels>, which will spawn on the sides and attack the NPC no matter what. <Harvesters Klaw Veteran Assaulters> are more powerful version. As long as they are taken away from attacking <Bastiel'sBastiel>/<Bastikan'sBastikan>, they should pose no major threat, though pulling too many of them at once can easily wear down certain classes' HP.
Two other crucial types are the <Harvesters Exploding Bugs> and <Harvesters Klaw Gatherers>. <Harvesters Exploding Bugs> spawn every now and then and will begin casting ![]() <Explosion>. This one will instantly kill all players in the group as well as the NPC, forcing a fail of this stage. These bugs are the priority to kill as soon as they spawn. Smaller exploding bugs will appear once they are killed, and they will also explode killing everyone. An alternative to just slaying them is putting them on a sleep state, enough time for the Cleric to finish healing.
<Explosion>. This one will instantly kill all players in the group as well as the NPC, forcing a fail of this stage. These bugs are the priority to kill as soon as they spawn. Smaller exploding bugs will appear once they are killed, and they will also explode killing everyone. An alternative to just slaying them is putting them on a sleep state, enough time for the Cleric to finish healing.
<Harvesters Klaw Gatherers> are another key element to success. These will spawn one after another, and leave behind an orb on the spot they are killed. This orb will grant the ![]() <Vitality Recovery> skill to the user, which will appear on top of the player's quickbar. Unlike normal skills,
<Vitality Recovery> skill to the user, which will appear on top of the player's quickbar. Unlike normal skills, ![]() <Vitality Recovery> will be more effective when used on <Bastiel>/<Bastikan>. Only Clerics are able to interact with this orb however. The
<Vitality Recovery> will be more effective when used on <Bastiel>/<Bastikan>. Only Clerics are able to interact with this orb however. The ![]() <Vitality Recovery> usage only lasts 30 seconds. With each orb picked up, the healing becomes stronger, up to a tier 3, which by then healing the NPC is almost instant.
<Vitality Recovery> usage only lasts 30 seconds. With each orb picked up, the healing becomes stronger, up to a tier 3, which by then healing the NPC is almost instant.
Fully healing <Bastiel>/<Bastikan> will despawn all mobs and open the way.
Altar of Serenity[]
This is the final a circular platform and resurrection skills are disabled. While fighting the four Harvesters, the door will remain open, however, during the battle against <Opel>/<Shurak>, they will be closed until the boss resets or is killed, preventing anyone from rejoining if they resurrect at the start.
Harvesters[]

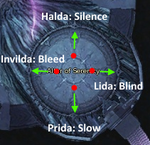
Harvesters positioning.
The four Harvesters include <Arrogant Prida>, <Jealous Invilda>, <Enraged Halda> and <Envious Lida>. In order to defeat them, all four have to have killed. The difficulty comes from the Aura skills they each have. They will create wide circles around them when casted, and anyone standing on them will receive an altered state. <Arrogant Prida> will use ![]() <Prida's Aura>, which will reduce movement speed of those near her. <Jealous Invilda> will use
<Prida's Aura>, which will reduce movement speed of those near her. <Jealous Invilda> will use ![]() <Invilda's Aura>, leaving targets in a bleeding state. <Enraged Halda> will use
<Invilda's Aura>, leaving targets in a bleeding state. <Enraged Halda> will use ![]() <Halda's Aura>, silencing nearby targets. And <Envious Lida> will use
<Halda's Aura>, silencing nearby targets. And <Envious Lida> will use ![]() <Lida's Aura>, blinding nearby targets.
<Lida's Aura>, blinding nearby targets.
Not only the combination of every state is deadly, but also additional damage will be received if the player gets hit while already being under the effect of an Aura. Because of this, the group must assign one member to each Harvester. <Arrogant Prida> (movement speed) and <Jealous Invilda> (bleeding) can be done by any class. <Enraged Halda> (silence) requires physical classes. <Envious Lida> (blind) requires magic classes.
During the battle, they will have to pull them to the opposite edges of the platform from each other, while the healers stay in the middle. At the same time, all members must remain under the effect of an Aura. As long as <Arrogant Prida> is alive, players will receive huge chunks of damage every second. This is countered by the protective shield effect given by all four Auras against this damage. As long as the support classes do not stand in <Enraged Halda'sEnraged Halda> range, they will be safe.
Once one of them dies, the three others will become enraged and their damage will be stronger. Regardless of this, groups can easily heal through this and kill them all one after another. It is mostly recommended <Arrogant Prida> is the first one to die, that way there will no longer be need to remain under the effect of an aura.
Opel/Shurak[]
This fight begins shortly after killing the Harvesters. The boss will be <Cursed OpelOpel>/<Cursed ShurakShurak>. Damage dealers play the most important role in here, as high damage output and awareness of mechanics is crucial. Through the fight, he will go through three different phases. At first, he will stick to normal attacks, ![]() <Ice Spear>,
<Ice Spear>, ![]() <Cold Smash> and
<Cold Smash> and ![]() <Frozen Breath>. Each change of phase is signalled by his use of
<Frozen Breath>. Each change of phase is signalled by his use of ![]() <Hideous Cold>.
<Hideous Cold>.
The four DPS members will position themselves below the platform where they entered from between the boss and the wall, while support will stay to the sides of them, each on one. Everyone should stick to the wall as much as possible. This positioning is key for two skills used by the boss. ![]() <Frozen Breath> will paralyse everyone within a frontal cone area for some seconds. This positioning allows to always have a player not frozen and therefore heal if someone is about to die. Groups may sometimes wish to prioritise damage output when this skill is used, as such, they will try to only get one person frozen. This can be done by paying attention to who the boss is targeting while casting
<Frozen Breath> will paralyse everyone within a frontal cone area for some seconds. This positioning allows to always have a player not frozen and therefore heal if someone is about to die. Groups may sometimes wish to prioritise damage output when this skill is used, as such, they will try to only get one person frozen. This can be done by paying attention to who the boss is targeting while casting ![]() <Frozen Breath>. That player will stay in place, while everyone else will move behind the boss, out of the skill's range.
<Frozen Breath>. That player will stay in place, while everyone else will move behind the boss, out of the skill's range.
Another deadly skill is ![]() <Cold Smash>. Used from time to time, this skill will leave behind a bleeding effect on the DPS classes. However, if hit by the skill again while being under the effect of the bleeding will instantly kill those affected. The support classes must cleanse this debuff instantly. This is usually also used along
<Cold Smash>. Used from time to time, this skill will leave behind a bleeding effect on the DPS classes. However, if hit by the skill again while being under the effect of the bleeding will instantly kill those affected. The support classes must cleanse this debuff instantly. This is usually also used along ![]() <Hailstorm>, which will make one section of the platform inflict damage on whoever stands on it. Everyone must move out from it quickly and adjust to the new positioning.
<Hailstorm>, which will make one section of the platform inflict damage on whoever stands on it. Everyone must move out from it quickly and adjust to the new positioning.
![]() <Hideous Cold> is pretty much his most dangerous mechanic. He will use this skill on someone, leaving them a 20 second debuff. After this countdown reaches zero, everyone will automatically die, resetting the fight. The idea is to sacrifice one player so that
<Hideous Cold> is pretty much his most dangerous mechanic. He will use this skill on someone, leaving them a 20 second debuff. After this countdown reaches zero, everyone will automatically die, resetting the fight. The idea is to sacrifice one player so that ![]() <Hideous Cold> does not go off. Much like
<Hideous Cold> does not go off. Much like ![]() <Cold Smash>, being under the effect of
<Cold Smash>, being under the effect of ![]() <Hideous Cold> leaves behind a debuff, and receiving the skill while under the effect of this debuff will automatically kill that person. Players are meant to transfer this effect to one another in order to sacrifice the desired person.
<Hideous Cold> leaves behind a debuff, and receiving the skill while under the effect of this debuff will automatically kill that person. Players are meant to transfer this effect to one another in order to sacrifice the desired person.
In order to transfer ![]() <Hideous Cold>, a skill will appear in top of the affected player's quickbar. The player must target the player and use the skill on them. For example,
<Hideous Cold>, a skill will appear in top of the affected player's quickbar. The player must target the player and use the skill on them. For example, ![]() <Hideous Cold> is first given to Player 1. If Player 1 is the one being sacrificed, they will need to transfer
<Hideous Cold> is first given to Player 1. If Player 1 is the one being sacrificed, they will need to transfer ![]() <Hideous Cold> to Player 2, and Player 2 transfers it back to Player 1, who dies instantly, unable to rejoin for the rest of the battle. Generally, players must have decided who is sacrificed first before beginning the battle, and chose to mark them with numbers. The most optimal order is getting rid of the weaker DPS classes. The secondary support class should only be used as sacrifice near the end, if needed.
<Hideous Cold> to Player 2, and Player 2 transfers it back to Player 1, who dies instantly, unable to rejoin for the rest of the battle. Generally, players must have decided who is sacrificed first before beginning the battle, and chose to mark them with numbers. The most optimal order is getting rid of the weaker DPS classes. The secondary support class should only be used as sacrifice near the end, if needed.
An alternative is to, instead of sacrificing someone right away, ![]() <Hideous Cold> is passed around between all group members, where each person keeps it for 10 or 15 seconds before passing to the following player. While this maximises damage done on the boss, this requires a lot more awareness and may cause sheer luck to screw over the group if whoever has
<Hideous Cold> is passed around between all group members, where each person keeps it for 10 or 15 seconds before passing to the following player. While this maximises damage done on the boss, this requires a lot more awareness and may cause sheer luck to screw over the group if whoever has ![]() <Hideous Cold> is hit with
<Hideous Cold> is hit with ![]() <Frozen Breath>.
<Frozen Breath>.
Another important mechanic to pay attention to will be Summon: Ice Cluster. This will create an Ice Cluster by the boss, which will paralyse two random group members indefinitely. The first time its used, its almost instantly destroyed by <Bastiel>/<Bastikan>. However, every time after that, <Bastiel>/<Bastikan> will be frozen in place by a Frost Prison some moments before Summon: Ice Cluster is used. Its crucial for the whole group to focus on destroying the Frost Prison before the Ice Cluster freezes a crucial role.
Later on the fight, <Cursed OpelOpel>/<Cursed ShurakShurak> will add ![]() <Freeze Soul> to his set. This AoE will affect almost everyone on the platform, leaving behind a debuff which will not let them attack the boss or interact with people who are not under its effect. The only way to remove this state is killing the Soul Watcher, a simple mob only visible to those who have
<Freeze Soul> to his set. This AoE will affect almost everyone on the platform, leaving behind a debuff which will not let them attack the boss or interact with people who are not under its effect. The only way to remove this state is killing the Soul Watcher, a simple mob only visible to those who have ![]() <Freeze Soul> on them.
<Freeze Soul> on them.
Finally, we have ![]() <Frost Barrier> and
<Frost Barrier> and ![]() <Chilling Cold>. The first ability will give the boss an invulnerability shield for 1 minute. The only way to remove said shield is by using
<Chilling Cold>. The first ability will give the boss an invulnerability shield for 1 minute. The only way to remove said shield is by using ![]() <Chilling Cold>. Much like
<Chilling Cold>. Much like ![]() <Hideous Cold>,
<Hideous Cold>, ![]() <Chilling Cold> will be used on a random group member, and they will be able to pass it around to others.
<Chilling Cold> will be used on a random group member, and they will be able to pass it around to others. ![]() <Chilling Cold> must be passed around a few times before its strong enough to be used on the boss and break the shield. If used on him too early,
<Chilling Cold> must be passed around a few times before its strong enough to be used on the boss and break the shield. If used on him too early, ![]() <Chilling Cold> is wasted and he will keep his shield. However, much like
<Chilling Cold> is wasted and he will keep his shield. However, much like ![]() <Hideous Cold>, passing it will leave behind a debuff on the person, and being hit by it while having said effect will instantly kill the person.
<Hideous Cold>, passing it will leave behind a debuff on the person, and being hit by it while having said effect will instantly kill the person. ![]() <Chilling Cold> also has a much shorter timer; 5 seconds.
<Chilling Cold> also has a much shorter timer; 5 seconds.
Due to the complexity of this mechanic, most groups will instead opt to let ![]() <Chilling Cold> be wasted and wait for the boss' shield to end. By the time, he will usually be rather low on HP, meaning the group can just burn him down after that. When low, he will receive the
<Chilling Cold> be wasted and wait for the boss' shield to end. By the time, he will usually be rather low on HP, meaning the group can just burn him down after that. When low, he will receive the ![]() <Schizophrenia> buff on him, signalling the battle is over. He will have increased attack power, but we wont use any skills. Once dead, a treasure chest will spawn, containing the instance's main rewards.
<Schizophrenia> buff on him, signalling the battle is over. He will have increased attack power, but we wont use any skills. Once dead, a treasure chest will spawn, containing the instance's main rewards.
Quests[]
Other than the introductory quest, all quests associated with the instance are either automatically obtained upon entering or picked inside the area.
- Elyos
 [Instanced Dungeon/Group] Whereabouts of the Missing Daevas [?]
- [Instanced Dungeon/Group] Attack Bastion of Souls [?]
- [Instanced Dungeon/Group] Horrible Truth [?]
- [Instanced Dungeon/Group] A Flower that Blooms with Blood [?]
- [Instanced Dungeon/Group] An Undelivered Letter [?]
- [Instanced Dungeon/Group] Logion's Journal [?]
- [Instanced Dungeon/Group] Unclaimed Balaur Sword [?]
- Asmodians
- [Instanced Dungeon/Group] Investigating the Bastion of Souls [?]
- [Instanced Dungeon/Group] Bastikan's Orders [?]
- [Instanced Dungeon/Group] Kidnapping, Torture, and Sacrifice, Oh My! [?]
- [Instanced Dungeon/Group] Evil Incarna [?]
- [Instanced Dungeon/Group] Shurak's Letter [?]
- [Instanced Dungeon/Group] Harogen's Journal [?]
- [Instanced Dungeon/Group] The Drakan's Sword [?]
Rewards[]
After defeating <Enraged MahoroshMahorosh>, a chest will spawn, dropping the instance's main rewards.
- Ancient Nighthaze set
- <Grade C Minium>
- <Ancient PvE Enchantment Stone Bundle>
- <Hamerun Minion Contract>
- <Abija Minion Contract>
- <Saendukal Minion Contract>
- <Karemiwen Minion Contract>
Gallery[]
")
")
")
")
Trivia[]
- This instance was originally added as a 12-player alliance instance as the main content for the patch. It used to be accessible from a small floating platform between Drakenwreck and Krotan Rock in Reshanta. After being turned into a group instance, it was moved to Frigida Legion Observation Post in south Lakrum. Rifts would also randomly appear across Lakrum allowing access to the instance.
- The instance received a considerably rework in 6.0 after being changed into a group instance.
- It would originally feature a large variety of modes, from escorting and protecting NPCs to timed sections and varying difficulty.
- The current fight against <Cursed OpelOpel> and <Cursed ShurakShurak> is a combination of the three difficulties of the boss.
- Financie/Canely (the soul in the Path to Serenity) no longer has a quest associated with her.
- <Shuratna'sShuratna> purpose was reduced to a simple quest item giver.
- <Harvesters Weapon> and <Harvesters Armor Box> were kept (with changed locations), and can still be destroyed. Their purpose is however unknown.
- The instance got a major rework after 7.0, changed from a group instance to a solo one.
- All sections after the Incarna Prison Camp were scrapped, making <Enraged MahoroshMahorosh> the main and only boss of the instance.
- Access to certain floors of the Incarna Prison Camp was cut out, making Floor 4 completely inaccessible, as well as the outer paths.
- The Bastion of Souls can be seen in the sky-box of Reshanta, as a gigantic floating temple.
- The storyline associated with this instance would begin with Dredgion Defense, and continued in Mirash Sanctum, leading to the events of The Scarring.
- A side quest comments that such a devotion the Balaur had for this project, the Harvesters did not only use Daevas as sacrifices for the Incarna, but sapiens, spirits and even other Balaur as well.
- The instance is referred to as "idab1_ere" in files.